3-coat pearl gradation paint
standard specifications
3-coat pearl gradation paint standard specifications
| Working Process |
Work | Air Pressure (Mpa) |
Amount of Discharge (Rotations) |
Gun Range (cm) |
|---|---|---|---|---|
| Discarding
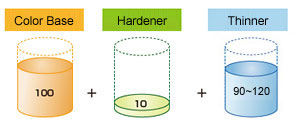
Color Base |
 (2)The pattern is thinly and uniformly layered around 1/2. (3)If you encounter a problem like having dust, etc., please polish with #1000 or above paper (sandpaper) after drying. |
0.15~0.20 | 3.0~3.5 | 15~20 |
| (Final color) of the color base |
(1) The pattern is uniformly layered as to be hidden when gloss is applied around 2/3. (Re-coating is performed after it is dry to the touch.) | 0.15~0.20 | 3.0~3.5 | 15 |
| Muddy Pearl Base | * To apply more color base gradation over a larger area, thinly paint 1~2 times and erase the gradation somewhat. | 0.15~0.20 | 2~3 | 15~20 |
| Pearl Base (Gradation) |
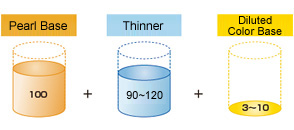 * At the time of applying color base paint, release the spray gun, paint several times while confirming the feel of the pearl. (Re- coating is performed after it is dry to the touch.) (2)Spread the paint while blending evenly so that there is no gradation at the edges. |
0.1~0.15 | 2.0~2.5 | 20 |
| Setting | (1)Room temperature drying.(Until dry to the touch) *10 minutes at 20°C | |||
| Clear |
(1) Discard paint Apply paint thinly and uniformly. (2) Finish. After confirming that the finish is dry to the touch, apply 2 coats, and finish the surface *(Please refer to the enclosed manual for the formulation ratio of clear and Hardener) |
0.2~0.22 | 3 | 10~15 |
| Clear and Gradation |
(1) 2-step gradation. *1st time... Dilute with 30~50% urethane thinner of the clear remaining in the cup. *2nd time... Dilute further with the remaining 50% of the urethane thinner. |
0.05~0.1 | 1.5~2 | 10~15 |
| Drying |
(1) Specified drying conditions for each clear. (Please refer to the enclosed manual for the specified drying conditions of the clear) |
|||
| Polished finish | (1)For dirt, hard to clean spots and rough areas, polish using 1500~2000 paper, and condition the surface with compound. |